11. Plenty of Monsters <<< Contents >>> 13. Beginning with Graphics
Our next program will be a game called Snake. You have probably already seen such a game before. A snake moves around the sheet, eating food, and it gets one piece longer with each gulp. We will improve the game. The snake will eat various kinds of food, and its pieces will vary accordingly to what it has eaten.
Create a new program called Snake (or Snake 2, if a program with this name already exists). An empty program opens. In a while, we will fill the program window with a fine new game. If you want, you can open the Snake program, which is prepared among Peter’s sample programs.
We will prepare the sheet by enclosing it
with a wall. From the item library, drag the Wall ![]() item
(from the [examples]\Cottage group) into the Global Variables and Functions window. Double-click the sheet
item
(from the [examples]\Cottage group) into the Global Variables and Functions window. Double-click the sheet ![]() element to invoke the main sheet editor. Put the Wall item into the upper left corner.
element to invoke the main sheet editor. Put the Wall item into the upper left corner.
We will look at a new sheet property. Each square contains, apart from an item picture, five logical flags and three numeric values. A logical value can keep a yes/no state, which can be tested. In our program, we will use the first flag to signalize that there is a wall on the square. We won’t have to evaluate the item on the square, we will just ask the flag: "Is there a wall on the square?" We can even use several variants of walls.
The sheet editor toolbar contains (on the
right side) a drop-down box for types of editing. Select the Flag 1 ![]() function here. The appearance of the sheet changes; a little dark
red square
function here. The appearance of the sheet changes; a little dark
red square ![]() appears
in the upper left corner of each square. The little square is a
state indicator for the first flag in the square. Now it is off
(its state is "no"). Click the Editing
appears
in the upper left corner of each square. The little square is a
state indicator for the first flag in the square. Now it is off
(its state is "no"). Click the Editing ![]() button on the toolbar.
This activates the square contents editing mode. Click the square
in the upper left corner with the Wall
item. The little square changes to light red color and a check
mark
button on the toolbar.
This activates the square contents editing mode. Click the square
in the upper left corner with the Wall
item. The little square changes to light red color and a check
mark ![]() appears. Flag 1
on the square is now on (its state is "yes"). Turn off the editing mode by clicking the Editing
appears. Flag 1
on the square is now on (its state is "yes"). Turn off the editing mode by clicking the Editing ![]() button again.
button again.
Now we want to raise a wall around the
whole sheet. There is an easier way to do it than repeated
copying with the right mouse button. Click the Filling ![]() button on the toolbar. Press and hold the left mouse button on
the wall item in the upper right corner of the sheet, and drag
the mouse to the upper right corner of the sheet. Release the
mouse button there. The part of sheet that you have selected by
this will be filled with the starting item. Fill the remaining
borders in a similar way. When you finish, click the Filling
button on the toolbar. Press and hold the left mouse button on
the wall item in the upper right corner of the sheet, and drag
the mouse to the upper right corner of the sheet. Release the
mouse button there. The part of sheet that you have selected by
this will be filled with the starting item. Fill the remaining
borders in a similar way. When you finish, click the Filling ![]() button again to turn it off. You can also add walls inside the
sheet, e.g. like this:
button again to turn it off. You can also add walls inside the
sheet, e.g. like this:
Prepare food for the snake. Create five new items and draw different kinds of food into them. For example:

We will create the pieces of the snake. You can copy the food items and modify them like this:

In a similar way, create three items with pictures of poisons, and one piece of the snake with a picture of a skull:

Our last graphical task is to create the
snake’s head. We will use Peter for this. Double-click the Peter ![]() element in the Global
Variables and Functions window
to edit it. Click the Properties
element in the Global
Variables and Functions window
to edit it. Click the Properties ![]() button to open the window with sprite properties. Change the Delay Between Phases value from 55 to 165 (time between animation phases), change Phases per Step (0 =
immediately) from 8 to 0 (the sprite moves immediately), and change Standstill Phases from 1 to 2 and Moving
Phases from 4 to 0. Close the window by pressing Enter. The Peter sprite has four directions and two
standstill phases now.
button to open the window with sprite properties. Change the Delay Between Phases value from 55 to 165 (time between animation phases), change Phases per Step (0 =
immediately) from 8 to 0 (the sprite moves immediately), and change Standstill Phases from 1 to 2 and Moving
Phases from 4 to 0. Close the window by pressing Enter. The Peter sprite has four directions and two
standstill phases now.
Discard the first picture of Peter on the
upper left. Double-click the picture to edit it, and then draw a
snakehead looking to the right. Click the Previous Edit ![]() button to return into the sprite editor. Using the right mouse
button, copy the first picture into the second picture in the
same row. Edit the head, so that the mouth is open. Copy both
pictures into the remaining rows for other directions. Turn the
heads on the pictures accordingly to the directions in the sprite
rows. You can do this by using the Edit
button to return into the sprite editor. Using the right mouse
button, copy the first picture into the second picture in the
same row. Edit the head, so that the mouth is open. Copy both
pictures into the remaining rows for other directions. Turn the
heads on the pictures accordingly to the directions in the sprite
rows. You can do this by using the Edit ![]() function. Finally, test
the sprite by clicking the Test
function. Finally, test
the sprite by clicking the Test ![]() button.
button.

We have several food items in our program, and we might want to add more of them in the future. With our present knowledge, we would have to handle each type of an item separately, which would not be very elegant. For this reason, we will learn how to use a new element — a list.
At first, we will prepare the list,
although we don’t know its function yet. From the program control ![]() group, drag the
list
group, drag the
list ![]() element into the Global Variables and
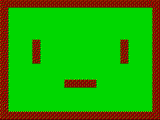
Functions window. Call it food list. When you expand it, you will see three elements.
Rename the first one, number
element into the Global Variables and
Functions window. Call it food list. When you expand it, you will see three elements.
Rename the first one, number ![]() , to
5 — number
of foods. The second element, index
, to
5 — number
of foods. The second element, index ![]() ,
should be renamed to food
index. The third one, index increment
,
should be renamed to food
index. The third one, index increment ![]() ,
will be called food
index increment. Add two new
items in the list, and call them food and food — snake.
,
will be called food
index increment. Add two new
items in the list, and call them food and food — snake.
Now we will explain what is a list. A list
is something like a book. All pages in the book look similar, for
example each page contains one picture and one text, but all of
the pictures or texts are different from the rest. Our list will
contain the items of food types and snake pieces, and it will
make the items easier to use. Each page in the list will contain
a different picture of food and a different picture of a snake
piece. The first item in the list ![]() identifies the number of pages. In our
case, there are five types of food. The second item
identifies the number of pages. In our
case, there are five types of food. The second item ![]() is a number of the
current page in the list — a list pointer (the numbering
starts with page 0). The third item
is a number of the
current page in the list — a list pointer (the numbering
starts with page 0). The third item ![]() specifies the number of pages that the
pointer automatically moves with each access to the data in the
list.
specifies the number of pages that the
pointer automatically moves with each access to the data in the
list.
We have to fill in the food list during the start of the program. It means that we have to specify, what item will be on which page. The commands for filling in the list are shown on the following picture. Put them into the beginning of the main program function.
Before we start to fill in the food list,
we will specify the initial page, from which we will start
filling in the list. We will set the food index
![]() element to 0. We will use automatic increasing of page number,
and so we will set the food
index increment
element to 0. We will use automatic increasing of page number,
and so we will set the food
index increment ![]() to 1.
to 1.
First, we will fill in the food item on all pages of the list. Gradually fill the food elements with individual food type items. The items are stored in the list, and after each item is set, the page number automatically increases by one. After the last item is set, the page pointer automatically moves to the beginning. We will start to fill in the food — snake elements. The page number increases automatically again. When we finish, we set the automatic increasing of page numbers to 0, as we won’t use automatic increasing in the program anymore.

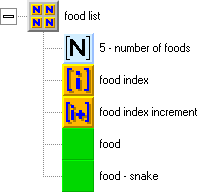
If the player fails, that is if the snake hits the wall or eats poison, the game begins anew. For this, we will need to redraw the starting sheet of the program, without food and poison. We could clean it programmatically, but there is an easier way. We will save the main sheet into a variable of the sheet type, and simply restore the sheet in a new game by using this variable.
Create a new sheet variable (copy the sheet element from the Library of Variables and Functions window to the Global Variables and Functions window), and call it saved sheet of the game. Put a command for saving the main sheet to the beginning of the program:
The score will be displayed during the game. Create a numeric variable called maximum score, and set it to zero.
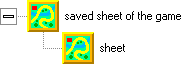
Create a new function called new game. The function will run at start, and so we will add it to the beginning of the program after the group for filling in the food list. It will be assembled accordingly to the following picture.
Create a logical variable called snake movement flag, a numeric variable called snake length, a numeric variable called next step counter and a function called display the number of snake pieces. The snake movement flag logical variable will be used to indicate the beginning of the snake’s movement (when the game is started, the snake stays in its place, waiting for a key to be pressed). Set the variable in the new game function to "off". The snake length variable indicates the number of snake pieces, and it increases during the game. In the beginning of a new game, it will be set to 0. The next step counter counts 0.1-second time impulses, before the snake is moved one square (it decreases from 5 to 0). In the beginning of a new game, the counter will be set to 1, so that the first step is performed immediately after the first key is pressed.
The following command in the new game recalls the saved sheet. Use the same command as when saving the sheet, but reverse the order of the elements. The following commands set the snake’s initial position. Turn off visibility for Peter, set his coordinates to X=9 and Y=8, turn him to the right, and make him visible again. In the end of the new game function, put the display the number of snake pieces function.
Now we will pay attention to the function that displays the number of snake pieces. Many games need to tell something to the player, e.g. the score. If we don’t want to pay too much attention to displaying information, we can quickly and simply write them into the window title. We will inform the player about the length of the snake, and optionally also about the highest score. While displaying the number of pieces, we will stick to grammatical rules, and so we will distinguish between 1 piece and 2...3...4... pieces. Here are the contents of the function:

The snake length of 0 will be set in the beginning of each game. In this moment, we can display information about the author of the program, or later, about the maximum score.

The picture contains a new element — window caption ![]() (from the controls
(from the controls ![]() group, dialogs
group, dialogs ![]() subgroup). The element is a text variable (it can be set or read)
representing the text in the window title bar. The merge of texts
subgroup). The element is a text variable (it can be set or read)
representing the text in the window title bar. The merge of texts ![]() element serves for connecting more texts into one. The connection
is made from the top to the bottom. Normal text can be specified
by typing it besides the text constant
element serves for connecting more texts into one. The connection
is made from the top to the bottom. Normal text can be specified
by typing it besides the text constant ![]() element. The conversion
of number to text form
element. The conversion
of number to text form ![]() element converts
numbers to their textual representations.
element converts
numbers to their textual representations.
The branches for other lengths of the snake are assembled in a similar way. Note that we can use one branch of the construction for more values of length.

A note on the window title usage: When a program starts, the name of its main function appears in its window title. If you don’t need to change the window title during the program run-time, it is enough if you edit the main function name. The main function name in new programs is preset to the program name.
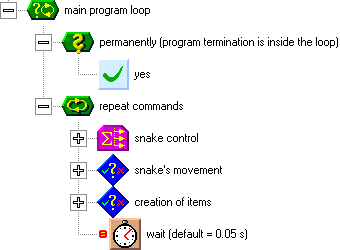
Now we will pay attention to the main
program loop. Put the conditional
repeating of commands ![]() element to the end of
the main function. Into the condition test, put the yes
element to the end of
the main function. Into the condition test, put the yes ![]() element. This will create a never-ending cycle. The program
closing will be handled inside the procedure for keys as a
reaction to the Esc key. In the beginning of the main loop, we will
create the procedure for keys, then we will handle the
snake’s movement, and finally we will handle the creation of
new items (food and poison). The last command in the loop will be
a waiting procedure, which will take care of the program timing.
You can insert the wait command into the loop now, and gradually,
we will put in the remaining procedures.
element. This will create a never-ending cycle. The program
closing will be handled inside the procedure for keys as a
reaction to the Esc key. In the beginning of the main loop, we will
create the procedure for keys, then we will handle the
snake’s movement, and finally we will handle the creation of
new items (food and poison). The last command in the loop will be
a waiting procedure, which will take care of the program timing.
You can insert the wait command into the loop now, and gradually,
we will put in the remaining procedures.
We will start with the creation of new
items. In front of the waiting, insert the conditional executing of
commands ![]() element, and call it creation of items. Its contents are on the following picture.
element, and call it creation of items. Its contents are on the following picture.
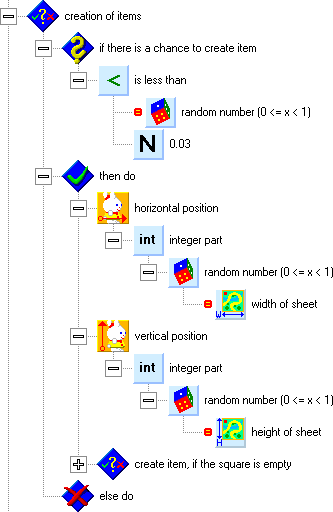
New things will be generated randomly, with a certain probability. For this reason, we will put a comparison of a random number with a constant into the condition test. By setting the constant to 0.03, we will ensure that a new item will be created during 3 out of 100 passes through the main loop. The probability of a creation of a new item is 3%.
We will create items on the sheet by using
Lucy again. First, we will put her onto a random square on the
sheet. We will use the width
of sheet ![]() element for her
horizontal position. This element will pass the value of 20, which is the width of the program sheet. It is
possible to specify the number directly, but it is better to work
with general numbers. This will save us from troubles if we
change something in the program in the future. We will pass the
width of sheet to the random
number
element for her
horizontal position. This element will pass the value of 20, which is the width of the program sheet. It is
possible to specify the number directly, but it is better to work
with general numbers. This will save us from troubles if we
change something in the program in the future. We will pass the
width of sheet to the random
number ![]() function, which will create a random
number between 0 and 19.999999999. The following function, integer part
function, which will create a random
number between 0 and 19.999999999. The following function, integer part ![]() ,
will delete the decimal part of the number. This will create a
random integer between 0 and 19. These numbers represent the
horizontal coordinates of the first and last square on the sheet.
You surely remember that the squares are numbered from the bottom
left corner to the top and right, starting with zero. Similarly,
we will create a random vertical position.
,
will delete the decimal part of the number. This will create a
random integer between 0 and 19. These numbers represent the
horizontal coordinates of the first and last square on the sheet.
You surely remember that the squares are numbered from the bottom
left corner to the top and right, starting with zero. Similarly,
we will create a random vertical position.
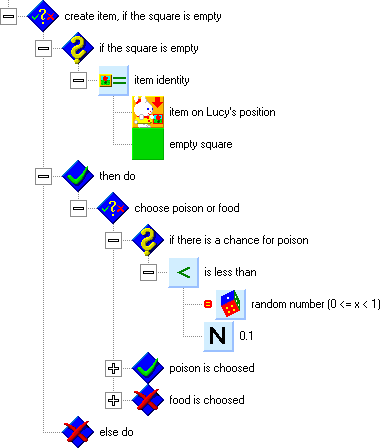
After we set a random position, we will use a conditional command, which will test if the square is empty. If it is, the program will use another conditional command to decide between creating food or poison. We will compare a random number with the value of 0.1, which will ensure that poison will be created in 1 of 10 cases. In other cases, food will be created. All of this is on the following picture:
The following picture shows how a new
poison item will be created. We will create different types of
poison with different probability. Most often, we want the
toadstool, and we want the box of poison in least cases. We will
use a multibranch
control structure ![]() . The branching
expression will be a random integer between 0 and 5, created by using the integer part
. The branching
expression will be a random integer between 0 and 5, created by using the integer part ![]() and
random number
and
random number ![]() elements, and the number 6
elements, and the number 6 ![]() .
.
The first branch will create a skull in 2 out of 6 cases (for the values of 0 and 1), which means that there is a 33% chance that a skull will be created. The second branch will give a smaller chance to the creation of the poison box — 1 of 6 cases (for the value of 2), so the chance is 17%. In the remaining 3 cases out of 6, a toadstool will be created (for the values of 3, 4 and 5), which means the probability is 50% here.
The creation of the poison will be finished
by turning Flag
2 ![]() on. As you remember, we had used Flag 1
on. As you remember, we had used Flag 1 ![]() to
indicate that there is a wall on the square. Flag 2 will be used
to indicate that there is a poison on the square. This will make
our work easier later, as we won’t have to test all of the
types of poison used in the program.
to
indicate that there is a wall on the square. Flag 2 will be used
to indicate that there is a poison on the square. This will make
our work easier later, as we won’t have to test all of the
types of poison used in the program.

Food will be created by a different method. As you can see on the next picture, it is quite simple, because we can use the list of food types.
In the beginning, we will choose a random
page in the list, and we will take the food item from it. We will
set the food index to a random value between 0 and 4. These are the indices of the first and last page.
Instead of specifying the range of random values directly, we
will use an element representing the number of pages in the list:
![]() . This will enable
us to add food types in the future without having to change the
method for their creation. We will keep the number of the food in
the numeric
value 1 (range 0 to 1023)
. This will enable
us to add food types in the future without having to change the
method for their creation. We will keep the number of the food in
the numeric
value 1 (range 0 to 1023) ![]() element for later use.
The following command will lay the food item on the position of
Lucy
element for later use.
The following command will lay the food item on the position of
Lucy ![]() . The last
command will turn Flag
3
. The last
command will turn Flag
3 ![]() on. Flag 3 will indicate that there is a
food on the square.
on. Flag 3 will indicate that there is a
food on the square.

That is all for the creation of new items
— you can test it now (be sure not to omit the waiting in
the end of the main loop). A snakehead opening its mouth should
appear in the middle of the sheet, and new items should be
appearing around it. You can close the program by clicking the ![]() button on the right side
of the window title bar.
button on the right side
of the window title bar.
We will continue by handling the snake
control. In the beginning of the main loop (in front of the
procedures for creating items), put a multibranch control
structure ![]() element and rename it
to snake
control. The method is on the
following picture.
element and rename it
to snake
control. The method is on the
following picture.
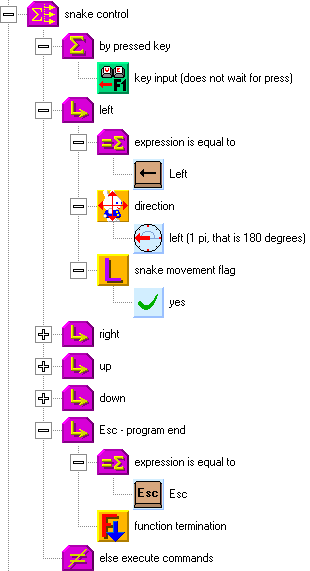
This means that as the branching value, we
will use the key
input (does not wait for press)
![]() function. The Left key will turn Peter (i.e. the snakehead) to the
left and turn on the snake movement flag. The other directions
will be similar. In the end, we will handle the Esc key — it will use the function termination
function. The Left key will turn Peter (i.e. the snakehead) to the
left and turn on the snake movement flag. The other directions
will be similar. In the end, we will handle the Esc key — it will use the function termination ![]() command (from the program
control
command (from the program
control ![]() group) to quit the
function. As it is the main program function, it will quit the
whole program.
group) to quit the
function. As it is the main program function, it will quit the
whole program.
Test the program. You can use the cursor keys (arrows) to turn the snakehead, and the Esc key to quit the program.
Our next task is to put the snake into movement. We will choose approximately 2 steps per second as the snake speed. For the sake of handling keyboard input and items generation, the main program loop works a little faster (18 passes per second). For this reason, we will use a counter for the next step, which will move the snake during every ninth pass.
The structure for snake movement is on the following picture. Put it behind the structure of snake control, but before the generation of new items. In the beginning of the structure, you can see a test, which checks if the snake is moving (this is because in the beginning of the game, the snake stays in one place until the first direction key is pressed). When the snake moves, the counter for the next step decrements (decreases by one). When the counter reaches zero, the snake can move one step. First, we will set the next step counter again. We have chosen the number 9, which represents 2 steps per second (the basic time unit of the computer is 55 milliseconds, which equals to 18 units per second).
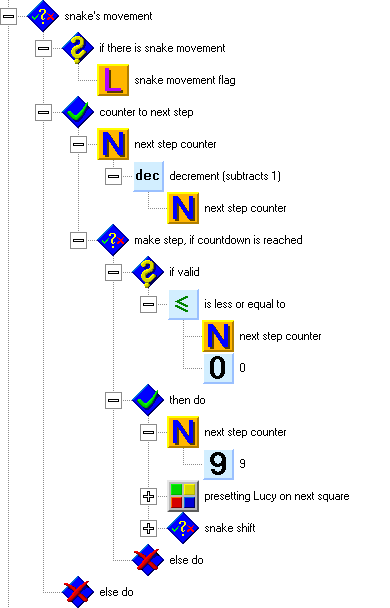
Before the snake moves, we will test whether there is an obstacle in front of it, which it cannot pass. Such an obstacle is a wall, but also the snake itself (that is, one of its pieces). We will use Lucy for this test. We will put her onto Peter’s position, turn her in his direction, and make a step forward.

You surely remember that we have indicated
walls by Flag 1 ![]() .
For the sake of simplicity, we will assign this flag also to the
squares with the snake pieces. If the flag is turned on, it means
that there is a wall or a snake piece in front of the snake, and
the snake passes away. We will play a sound of a hit and animate
the snake’s death. We will pay attention to this later. In
other cases, the snake can move forward.
.
For the sake of simplicity, we will assign this flag also to the
squares with the snake pieces. If the flag is turned on, it means
that there is a wall or a snake piece in front of the snake, and
the snake passes away. We will play a sound of a hit and animate
the snake’s death. We will pay attention to this later. In
other cases, the snake can move forward.

In the snake movement, we will begin with Peter — the snakehead. In approximately the middle of the structure of the movement, you see Peter making a step forward. The following branching structure stores a number, representing the direction of the last square, on the new square. Later, this number will help us find the way to the end of the snake.
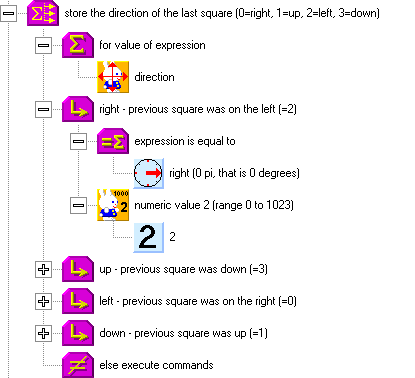
We will keep the number representing the
direction to the previous square as numeric value 2 ![]() .
When the previous square is to the right, we will use the number 0, when it is up, we will use number 1, number 2 will represent the left direction, and when the
square is to the bottom, we will use the number 3. The structure for the previous square on the left
is shown on the picture, the remaining directions are similar.
.
When the previous square is to the right, we will use the number 0, when it is up, we will use number 1, number 2 will represent the left direction, and when the
square is to the bottom, we will use the number 3. The structure for the previous square on the left
is shown on the picture, the remaining directions are similar.
Let us return to the beginning of the structure for moving the snake one step forward. We have left Lucy on the next square, where she tested the state of flag 1. Now we will turn her back and move her one step, which will get her to the same position as the snakehead. We can add a sound for the snake’s step.
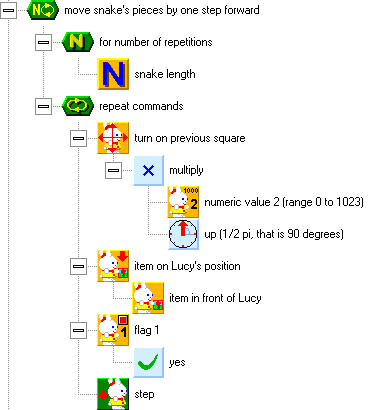
What follows is a cycle that moves the snake’s pieces, as you see on the following picture. The number of the passes of the cycle is given by the snake’s length. In the beginning, Lucy is on the position of the head. Each square with the head or a piece of the snake keeps a number representing the direction to the previous square. The number is a number of quadrants (i.e. quarters of a turnaround) that Lucy must turn counter-clockwise from the zero angle (zero angle equals the direction to the right).
First, Lucy turns to the previous square.
Using the following command, she carries the item from the
previous square to the square she stands on. This way, she moves
a snake piece one step forward. The next command turns on Flag 1 ![]() . As
we know, this flag indicates a wall or a snake piece. The last
command makes Lucy go one step forward, i.e. to the following
square towards the end of the snake.
. As
we know, this flag indicates a wall or a snake piece. The last
command makes Lucy go one step forward, i.e. to the following
square towards the end of the snake.
After all of the passes through the cycle, Lucy remains on the square behind the new end of the snake. This is valid even if the snake length is 0, when no pass through the cycle is performed. What follows is moving the snakehead one step forward and saving the direction to the previous field, which has already been described. We will replace the contents of the square behind the snake with an empty square (which will be performed by Lucy), and turn off the flag indicating that there is a piece of the snake on the square. If a food or a poison is found, we will add a new snake piece later.
The snake is moved. Now we will pay
attention to the contents of the square on the new position of
the snakehead. First, we will test, if there is food on it. Food
is indicated by flag 3, so we will test Flag 3 ![]() .
The structure for food is on the next picture.
.
The structure for food is on the next picture.

If there is food on the square, we will
delete it by laying down an empty square, and turn off Flag 3. The numeric variable 1 of the square stores the
number of the food from the food list. We will take numeric value 1 of the square and use it as the food index to get
the appropriate snake piece for the type of food. That means that
we will take the appropriate snake piece from the list and lay it
down on Lucy’s position. As we know, Lucy was left at the
square behind the end of the snake, where we had put an empty
square for a while. This creates a new snake piece with a food
inside. We will turn on Flag
1 ![]() to indicate a snake piece, and increase
the length of the snake. Finally, we can play a gulping sound and
show the new snake length.
to indicate a snake piece, and increase
the length of the snake. Finally, we can play a gulping sound and
show the new snake length.
The structure for poison is similar, as you see on the following picture. Poison is indicated by Flag 2. If we find it on, we will clear the square and turn this flag off. We will perform similar steps to the structure for food. We will always use the same new piece, without respect to the type of poison. We will also turn on flag 1 on Lucy’s position, increase the snake length, play a gulping sound, and display the new length. Only this time, this will be finished by the death of the snake.

Our last task is to create the function for the snake’s death. Its contents are on the next picture.
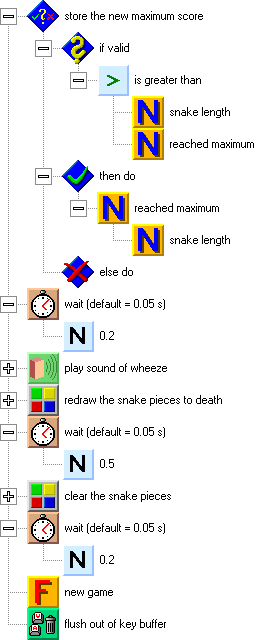
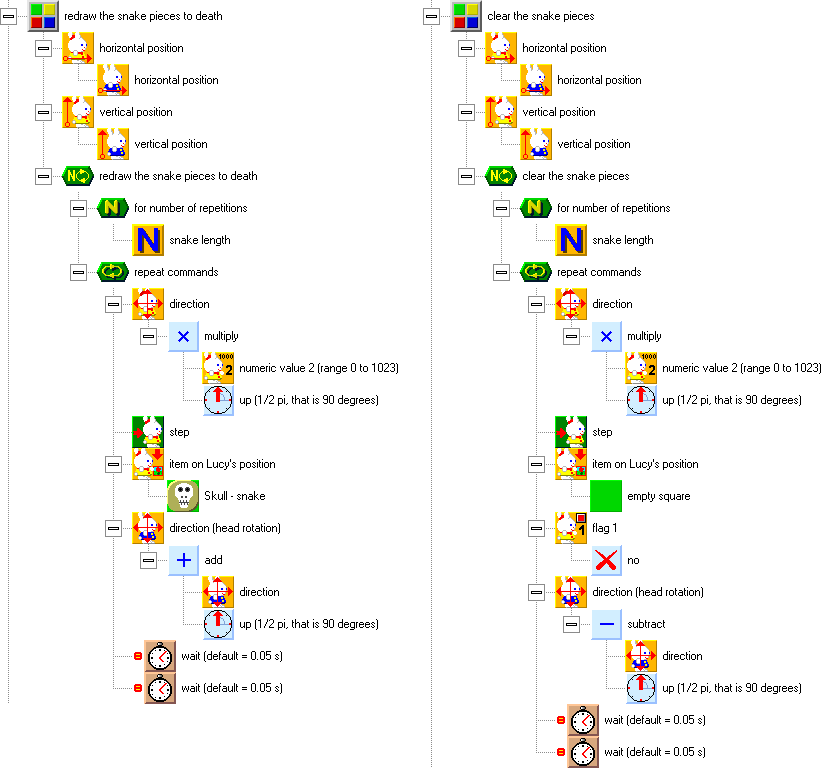
First, the length of the snake is stored as the new maximum score. After a short pause, there is a wheezy sound. The death will be indicated by redrawing all of the snake pieces to pieces with a skull. After the redrawing and a short pause, we will clear the pieces of the snake (this will indicate the process of dying). There is a short pause again, and then a new game starts.
After the beginning of a new game, it is important to add a command for flushing the key buffer out. Players who get absorbed in the game often still press keys when the game is being ended. This could cause an accidental start of a new game.
The following pictures show the redrawing of the snake pieces to death and the clearing of the pieces. Again, we use the directions to the previous squares stored in numeric value 2 of the squares. During that, we animate the snakehead to turn around (the snake is dizzy). In the first case, the snake turns clockwise; in the other, it turns counter-clockwise.
Now you can start the program and test it. Have fun with your first real game.
11. Plenty of Monsters <<< Contents >>> 13. Beginning with Graphics