10. Keyboard Control <<< Contents >>> 12. Feeding the Snake
We will try to make a little game. You would not believe what has happened. Peter has found monsters in the maze. However, do not worry, we will arm him, and he will handle them. We will continue with the Way program from the previous chapter, in which the last method of control is turned on — Controlling by Holding Keys 2. The other possibility is to open the Monsters program, which is prepared as a sample program.
First, we will prepare the monster. In the Global Variables and
Functions window, make a copy
of the empty
square ![]() element. Rename it to Monster and draw a monster into it, e.g. like this:
element. Rename it to Monster and draw a monster into it, e.g. like this:

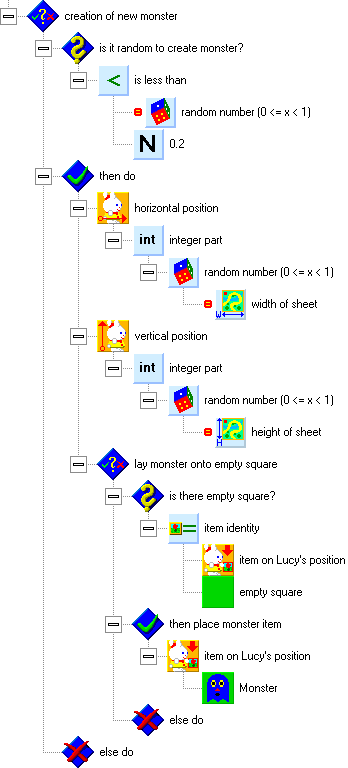
Monsters will be generated randomly. Add
the conditional
executing of commands ![]() element into the main
program loop. Into the
if valid
element into the main
program loop. Into the
if valid ![]() condition test, insert
the is less
than
condition test, insert
the is less
than ![]() comparative function (from the calculations
comparative function (from the calculations ![]() group, comparisons
group, comparisons ![]() subgroup). The first parameter for comparison will be the random number (0 <= x
< 1)
subgroup). The first parameter for comparison will be the random number (0 <= x
< 1) ![]() function (from the calculations
function (from the calculations ![]() group, functions
group, functions ![]() subgroup). The second parameter will be a numeric constant
subgroup). The second parameter will be a numeric constant ![]() set
to 0.2 (either as the element text or using the digits and
decimal point elements). In a while, we will add the monster
creation construction.
set
to 0.2 (either as the element text or using the digits and
decimal point elements). In a while, we will add the monster
creation construction.
What will the random function do? The elements texts tell us: "If it is valid that a random number is less than 0.2, create a monster." The random number is a decimal number with a random value between zero and one. 0.2 is one fifth of one. The random number is less than 0.2 in every fifth case. This means that the monster will be generated in one fifth of cases.
To create the monster, we will use
Peter’s friend — Lucy. First, we will specify a random
place where the monster will be created. Into the condition
validity branch, drag the horizontal position ![]() and
vertical
position
and
vertical
position ![]() elements (from the Lucy
elements (from the Lucy ![]() group, Lucy -
extension
group, Lucy -
extension ![]() subgroup). Add the integer part
subgroup). Add the integer part ![]() function to both elements (from the calculations
function to both elements (from the calculations ![]() group, functions
group, functions ![]() subgroup), as the squares’ coordinates are integers. Add the
random number
(0 <= x < 1)
subgroup), as the squares’ coordinates are integers. Add the
random number
(0 <= x < 1) ![]() function to the
integer elements. The random number can have a parameter
specifying its range. For example, if you add 10, the random
number is generated in the range from 0 to 10. We will add the width of sheet
function to the
integer elements. The random number can have a parameter
specifying its range. For example, if you add 10, the random
number is generated in the range from 0 to 10. We will add the width of sheet ![]() element to the random number for the horizontal position, and the
height of sheet
element to the random number for the horizontal position, and the
height of sheet ![]() element for the vertical position (both elements are from the sheet
element for the vertical position (both elements are from the sheet ![]() group).
group).
Let us take a closer look at the
calculation of the horizontal
random position. The
referential element in the horizontal direction is the width of sheet ![]() .
This element returns a number indicating the width of the sheet
as a number of steps (squares). In our case, it will be 12, which
is the width of sheet that we had set before. This number is
passed to the random
number (0 <= x < 1)
.
This element returns a number indicating the width of the sheet
as a number of steps (squares). In our case, it will be 12, which
is the width of sheet that we had set before. This number is
passed to the random
number (0 <= x < 1) ![]() function, which
generates a number in the range from zero to the width of sheet
(without the border value), that is, a number between 0 and
11.99999999. The random number is passed to the integer part
function, which
generates a number in the range from zero to the width of sheet
(without the border value), that is, a number between 0 and
11.99999999. The random number is passed to the integer part ![]() function, which truncates the part of the number behind the
decimal point and returns only its integer. This creates a number
between 0 and 11, which are the coordinates of the first and last
square in the horizontal direction. You may have noticed that the
squares are numbered from the bottom left square, starting with
zero.
function, which truncates the part of the number behind the
decimal point and returns only its integer. This creates a number
between 0 and 11, which are the coordinates of the first and last
square in the horizontal direction. You may have noticed that the
squares are numbered from the bottom left square, starting with
zero.
Now we have Lucy on a random position on the sheet. We could lay the monster item onto the sheet now, but first we have to verify that the square is not occupied, e.g. by a wall. If the square is not free, nothing will be performed and no monster will be created. Here is the result; try to run the program:
Now we will improve the routines for controlling Peter’s steps. In the Global Variables and Functions window, use the right mouse button to copy the Cautious Step Forward function. A new function called Cautious Step Forward 2 is created. Rename it to Cautious Step in the Specified Direction.
Double-click the new function to edit it,
and look at the bottom left window. It is called Local Variables and
Functions. We don’t have
to worry about the function of this window; we will only use the input variables ![]() element. From the Library
of Variables and Functions
window, drag a new numeric variable number
element. From the Library
of Variables and Functions
window, drag a new numeric variable number ![]() into this element, and
call the variable requested
direction.
into this element, and
call the variable requested
direction.
Switch back into the main program function.
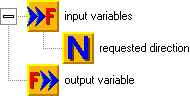
In the Controlling
by Holding Keys 2
construction, find the first branch (for the Up arrow). Insert
the new function called Cautious
Step in the Specified Direction
here. When you drop the function, you can see that the numeric
variable called requested
direction is connected to it.
It is the one that we have just created. It will pass the
requested direction of the step to the function. From the
direction setting command, drag the up ![]() element to the
function parameter. You can discard the remaining commands from
the branch (the direction setting and the Cautious Step Forward function). Adjust the branches for the remaining
directions in a similar way. This will be the construction for
the step upwards:
element to the
function parameter. You can discard the remaining commands from
the branch (the direction setting and the Cautious Step Forward function). Adjust the branches for the remaining
directions in a similar way. This will be the construction for
the step upwards:
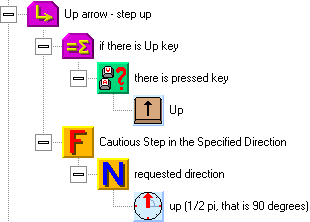
Now we will prepare the contents of the Cautious Step in the Specified Direction function. Switch into it. First, for testing purposes, try to add the command for setting Peter’s direction, and add the requested direction variable as the parameter. This restores the original functionality of the program, and we can verify that we did not make any mistake. Run the program and test it, it should work as before. If everything is all right, you can delete the direction setting command.
If we used the original control method for shooting, it would be unpleasant that we would not be able to turn to the target without making a step towards it. For this reason, we will improve the control. If Peter is not turned in the requested direction, he will turn first, and only after that, he will go. By pressing the key once, we will turn Peter around, and by holding the key, we will tell him to go. Edit the function accordingly to the following picture.
The function begins by comparing Peter’s actual direction with the requested direction, which is passed as the function parameter. This way, we will check if Peter is already turned to the requested direction.
If Peter is turned in the appropriate direction, he can make a step forward. However, he will do so cautiously. First, he tests if there is a wall in front of him. If there is not, he can make a step. If there is, he will stay on his place, and the wait command will be executed. The main program loop has to last for at least one wait interval, so that new monsters can be generated evenly. One wait interval is performed in the main loop, if no key for movement is pressed. The waiting when a key is pressed is handled in the movement function. The program does not wait after the step command, the step ensures the waiting internally.
If Peter is not turned to the requested direction, he turns, and the program waits for a while. The waiting ensures that Peter does not start to go when a key is pressed shortly.
Run the program and test its control. Pay special attention to testing Peter’s turning on his place and changing directions during walking.
Now we will handle the shooting at the monsters. Once again, we will use Peter’s friend Lucy. Lucy will be the shot. She will surely not mind and will be glad to do this for Peter.
Double-click the Lucy ![]() sprite in the Global
Variables and Functions window
to edit it (note — sprite is a moving animated object). You
will see a sheet with 4 x 5 pictures of Lucy. Click the Properties
sprite in the Global
Variables and Functions window
to edit it (note — sprite is a moving animated object). You
will see a sheet with 4 x 5 pictures of Lucy. Click the Properties ![]() button. A window for setting the sprite properties appears.
Change the Phases
per Step (0 = Immediately)
setting from 8 to 2 (the shot will fly quickly), and change the Moving Phases settings from 4 to 0 (the shot does not have to change its appearance
during the flight). Press Enter (or
click OK). The pictures of the sprite have changed, so that
Lucy is only in one column now.
button. A window for setting the sprite properties appears.
Change the Phases
per Step (0 = Immediately)
setting from 8 to 2 (the shot will fly quickly), and change the Moving Phases settings from 4 to 0 (the shot does not have to change its appearance
during the flight). Press Enter (or
click OK). The pictures of the sprite have changed, so that
Lucy is only in one column now.
Drag the first picture of Lucy with the
left mouse button, and drop it outside the pictures sheet. The
picture disappears; we have deleted it from the sprite.
Double-click the freed empty square. The sprite picture editor
appears. Draw a picture of the shot — for example, a small
gray ball (use the sphere ![]() tool and white color):
tool and white color):

Keep the original violet color as the background. It is a transparent color, through which the original contents of the square around the shot can be seen. In the color picker of the editor, it is the color in the upper left corner.
Click Previous Edit ![]() to
switch back to editing the Lucy sprite. Drag the first modified
picture with the right mouse button to copy it into the remaining
sprite squares. Later you can move the pictures, so that the
shots will fly exactly from the barrel of the gun.
to
switch back to editing the Lucy sprite. Drag the first modified
picture with the right mouse button to copy it into the remaining
sprite squares. Later you can move the pictures, so that the
shots will fly exactly from the barrel of the gun.
Test the modified sprite now. Click the Test ![]() button. A window with a green sheet appears, with the sprite of
the shot in the middle. Click somewhere into the sheet, and the
shot moves to the specified location. You can quit the test by
clicking Cancel.
button. A window with a green sheet appears, with the sprite of
the shot in the middle. Click somewhere into the sheet, and the
shot moves to the specified location. You can quit the test by
clicking Cancel.
The shot is prepared, and now we have to
handle its control. Return to the main program function. Into the
main loop, right behind the construction for generating monsters,
insert a new conditional
executing of commands ![]() element, and call it shot from the gun. As shooting will be activated by the spacebar,
insert the there
is pressed key
element, and call it shot from the gun. As shooting will be activated by the spacebar,
insert the there
is pressed key ![]() function with the spacebar
function with the spacebar ![]() element (from the keys
element (from the keys ![]() group, character
keys
group, character
keys ![]() subgroup) into the if valid
subgroup) into the if valid ![]() condition test.
condition test.
The whole construction that handles shooting is on the following picture. We set the shot (Lucy) in the starting position, then the shot flies, and when it reaches a target, we turn it off.
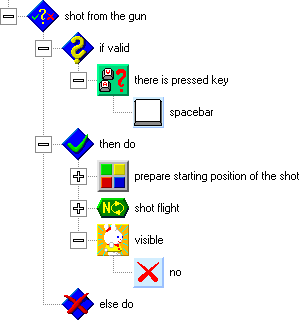
In the beginning of the shot’s flight, we set its position and direction accordingly to those of Peter, and then we make it visible. We know the position and direction elements, but what is a visibility element? All sprites (moving objects, including Peter and Lucy) have two basic states — visible and invisible. When in the visible state, the sprite is animated, and moves slowly. If it is invisible, it moves to a new position immediately. Peter becomes a "Super Peter", as quick as lightning.
Lucy’s visibility will be set by the visible ![]() command. As the sprite visibility parameter, we usually use a
logical constant yes
command. As the sprite visibility parameter, we usually use a
logical constant yes ![]() or no
or no ![]() ;
this way, we switch between the "Slowcoach" and "Superman"
modes. The activation of the shot is on the following picture.
For the sake of readability, it is in a separate group.
;
this way, we switch between the "Slowcoach" and "Superman"
modes. The activation of the shot is on the following picture.
For the sake of readability, it is in a separate group.
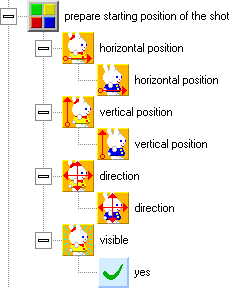
Now we will handle the movement of the
shot. Behind the group for preparation of the starting position
of the shot, add a command
repeating with specified run number ![]() cycle and label it shot
flight. As a number of
repetitions, type 4. This is the maximum distance that the shot can
fly.
cycle and label it shot
flight. As a number of
repetitions, type 4. This is the maximum distance that the shot can
fly.
The flight will be interrupted, if the shot
hits a wall. For this reason, in the beginning of the cycle body,
add a condition testing if there is a Wall item in front of Lucy. If there is, the execution
of the cycle will be interrupted by the break executing ![]() command (from the program
control
command (from the program
control ![]() group). After we check
for the wall, we can add the step
group). After we check
for the wall, we can add the step ![]() element for the
shot’s movement.
element for the
shot’s movement.
When the shot moves one step, we will test if it has hit the target. We will use a conditional command that will test, whether the item on Lucy’s position is a Monster. If it is, the monster will be deleted by laying down an empty square item, and the cycle of the shot’s flight will be interrupted. Some time in the future, you can add other elements here, such as a hit counter or a monster’s moan.
The whole construction for the shot’s flight is on the following picture. Add an element for turning off the visibility of Lucy behind it, and you can test the program.

If you want to make further
improvements, you can equip Peter with a gun. You can also add a
sound of the shot by using the play sound
![]() element. From the
bank of sounds, drag e.g. [examples]\Weapon\Rifle and Pistol\Pistol sound into the Global Variables and Functions window, and use it in the play sound feature. You
can also add a moan of the hit monster — e.g. the [examples]\Human\Shouts\Au 2 sound.
element. From the
bank of sounds, drag e.g. [examples]\Weapon\Rifle and Pistol\Pistol sound into the Global Variables and Functions window, and use it in the play sound feature. You
can also add a moan of the hit monster — e.g. the [examples]\Human\Shouts\Au 2 sound.