12. Feeding the Snake <<< Contents >>> 14. Mishmash Drawing
Our programs have only used items and sprites so far. Now we will get into a more interesting area — graphics.
Graphics bring unlimited capabilities, where item animation is not enough. We can draw graphical elements, such as dots, lines, and circles; what is most important, yet, is that we can also render pictures. We can use pictures to display photographs, move objects, write texts, or draw buttons for special controls.
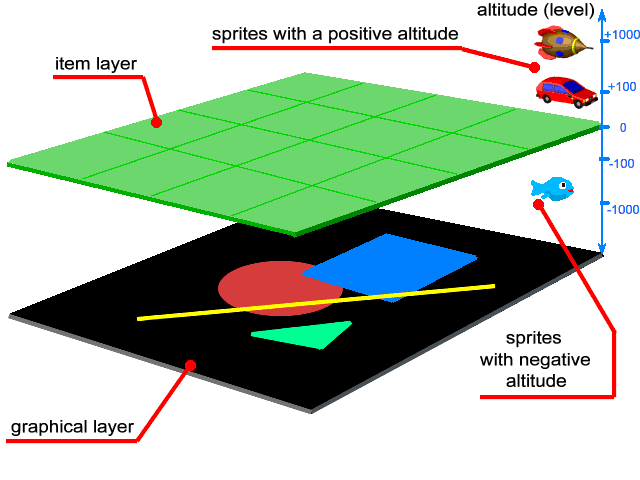
The first things we need to know is where and how are graphics rendered. Look at the following picture.
The picture shows the display layers of a program window in Peter. The basis is at the item layer. We have already used it in previous chapters. It is the layer where we put items, and it is called the main sheet of a program. Above this layer, there are sprites with a positive altitude (height level). These include Peter and Lucy (unless we change their altitude to a negative number). Under the item layer, there are sprites with a negative altitude. At the very bottom, there is a graphical layer. All graphical elements are rendered here.
You may imagine the layers as a sea. The item layer is the surface. Ships (sprites with an altitude of 0) move on the surface. Birds (sprites with a positive altitude, e.g. 100) fly above it. Fish (sprites with a negative altitude, e.g. -100) swim under it. The seabed in the very bottom is the graphical layer that may be used for drawing.
When we look at a program window, it is as if we have watched the sea from above. We see items on the sheet and sprites moving above it (Peter, Lucy), but don’t see sprites with a negative altitude, and neither do we see the graphical layer. To see these, we have to make items transparent. We will learn how in the following chapter.